This is a post I probably should have done a long time ago. Since the article and the video on building the Moravian workbench came out I have gotten a lot of emails asking questions about the design. More often than not the questions are about design changes and “what if” type things. Below are the most often asked questions and my answers. The answers are my opinions, based on my experience using the bench for the past seven years. I am not trying to piss anyone off, if anything below somehow offends you, I am sorry. I know the workbench stuff can be a touchy subject for some folks.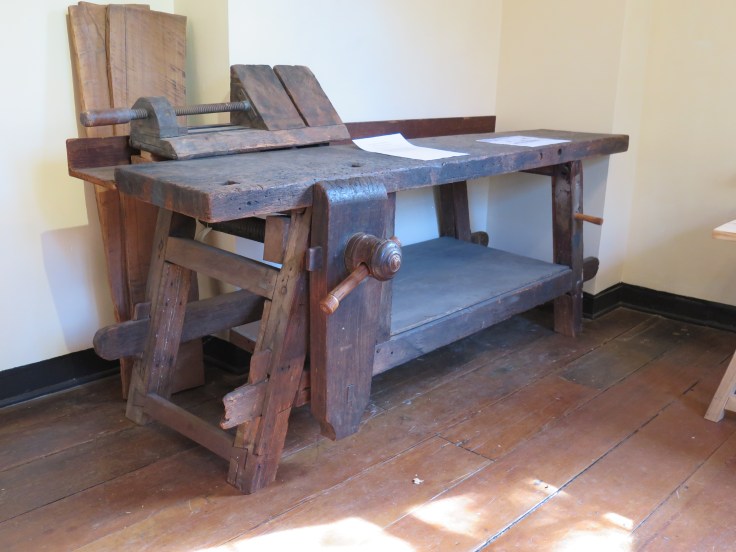
There is no perfect workbench, no perfect height, length, vice set ups (or lack of them), species of wood or weight. My advice would be to keep it simple as possible, you can modify it down the road if need be. If I had one major point to stress on building any style of work bench it would be this: Build a bench for what you do what you do everyday. For example, if you primarily make violins, don’t make a bench 20′ long because at some point in the future you think you might need to plane a long molding. If you work with long stock regularly, make a long bench. If not, build something more sane. You can figure out how to do the long molding when the time comes. Trying to build a workbench for every possible scenario imaginable is madness.
Q & A
- “You have been using the bench awhile, if you were to build one today what changes would you make?- I sure this answer is a let down; I would change nothing. I am still using the first Moravian bench I built and it has done everything I have asked of it. I was very critical of the bench the first year or so thinking I would find some kind of fatal flaw to the design; as of this writing I have not.

- “What problems have you run into with the narrow top”- The original bench at Old Salem has a 16″ wide by 2 1/2″ thick top. When I built the first one of these benches I had managed to dredge up an old barn beam 13 1/2 wide by 3 1/2 thick and used that instead. This turned out to be a good thing. I like the support of the thicker top but I can still pick up the top and move it without help. To have a top in the 3″ to 4″ thick range any wider than 13″ gets heavy and hurts mobility. Another thing I have noticed is the part of a workbench that needs to be the most significant and tough is the front 6″ or so. The wear on any bench top that has been used a while will prove this point. If chopping a mortise, boring, planing or whatever, you would not position the work piece a foot away from the front edge. You will place it as close to your body as you can, it is more comfortable to work that way.
- “I can’t get yellow pine or oak where I am; what is a good substitute?- Most any species of wood will work fine that you can get your hands on and afford. The main parts I would want use as hard and strong wood as possible are the top stretchers, vise chop, parallel guide and the wedges in the tusk tenons.
- “tool tray, really?”- This question usually arrives as a statement and question combined. “A tool tray is a waste of work space; can I just make a full width top?” I usually just answer yes to this question, most cases the person has made up there mind before they ever asked anyway. I have a different opinion on the tool tray that I arrived at it after using the bench awhile; I love it! Truth is, when I built the first bench I looked at the tool tray as a huge negative but in trying to keep with the original design, I built it with the tray. My work areas both have concrete floors. Vintage cast iron planes are dead after a fall from a bench to concrete. I have also noticed that a chisel dropped from a bench never, never ever lands on the handle. Beside helping to save my tools, my most used tools, gauges, pencil sharpener and layout tools that are used on most every project stay here and are always in arms reach. Sometimes it does get filled with shavings and gets a little like a rats nest. For myself anyway, the benefits outweigh the negatives. As for the full width top, if I were going to go that route, a two slab top would keep the bench more mobile. A board mounted flush with the slab replacing the tray, would do the trick as well (also refer to answer #2).

A tool tray is not all bad! - “I have a (name any brand) iron vise; would this be better than a leg vise?- No, No No and No. I have had a couple of these in the past and thought they were great at the time but I have been cultured since. In my experience, a well made and set up leg vise with Lake Erie Toolworks or Benchcrafted hardware is unbeatable. Every iron vise that I have ever used was an impediment. No matter what brand, new or old, I have come to hate them all equally. I am leg man all the way.
- “What size are the dog holes” I use 3/4″ hold fast and dog holes. There are larger hold fasts available nowadays, if using one of these I would make the dogs the same size so you can use the hold fasts in them as well.
- “How can I get one of your tail vises for the Moravian bench”- I am still working thru a backlog on these. When I get caught up, (hopefully before end of 2018) I will post them here.
That is all I have for now, I will update this post over time with more Q&A if the need arises.
Best,
Will Myers

Boy, that bench has really taken a beating. Good job!! Do you think that maybe some sandpaper and some Boiled Linseed Oil are in order? Just for a Thanksgiving treat for the bench?
LikeLike
Gonna’ keep working it like a borrowed mule!
LikeLike
I agree with your tool well comments. I added a tool tray / well to my recently built workbench. I was skeptical but I really like it too. The main reason I like it is because I seem to keep my tools more in more dedicated locations on the bench. So it’s easier to keep track of them during the work process.
Thanks for the article!
LikeLike
Like you when I first built the bench I had questions about its suitability for day to day use. The reason I built was to carry in my motorhome so portability was the prime reason for the build. After working on the bench I began to appreciate the thought and knowledge that went into the build and the amazing stability for such a light bench. I’m building my third one, this time scaled up to a full sized shop bench. It likely will replace my Roubo style bench as the main bench in my shop.
BTW, the second build had a split slab which after working on it was soon replaced with a tool tray.
Thanks for reviving the Moravian bench,
ken
LikeLike
To me the beauty of the portable Moravian design is not only it’s portability but also it’s design flexibility. You have the option to use a tooltray or not and different vise options if you wanted. e.g. I think a twin screw vice could be used instead of a leg vise though I’m a “leg man” as well.
I went with a two slab version (front slab 13″ and rear slab 9.5″) with a 1.5″ “gap stop” like a split top Roubo. This suits my requirements (planing wide boards etc) and I can still put tools (backsaws, marking gauges etc) in the gap stop without worrying about them falling off the bench. The gap stop can also be raised to act as a planing stop. The slabs are about 4″ thick for extra weight but still manageable on the portability side of things.
I added a tongue and groove shelf underneath set on ledger strips positioned so the shelf is about 1/4″ below the tops of the stretchers. This allows me to put planes, bench hooks etc there so they out of the way and will not fall on the floor. The shelf can be easily removed if I need to temporarily move the bench to a different site.
I can imagine that some of the things that people want to do with the design is perhaps illogical but the design is flexible enough that they can (and will! 🙂
In any case as Ken mentions above thanks for reviving the design and also a big thanks for taking the time to create the portable Moravian bench build video. Highly recommended the video if anyone is looking at building the design.
LikeLike
Great info – thanks Will!
LikeLike